Top Highlighting and Contouring Tips for Every Face Shape
Beauty
|
March 26, 2026
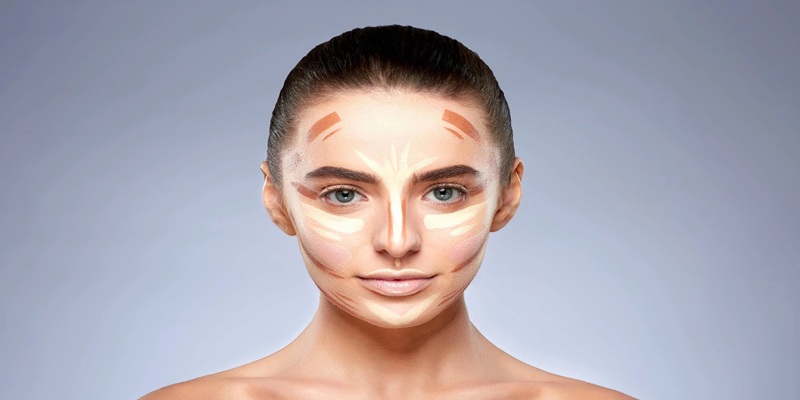
Have you ever tried makeup that lifts and defines parts of your face? Highlighting and contouring is a technique that can reshape your features, add depth, and create that naturally “flawless” look. But since everyone’s face shape is different, knowing how to adjust the technique makes a big difference. Whether your face is oval, round, square, heart-shaped, or diamond, learning how to highlight and contour properly can completely change your overall makeup result.
Understand Your Face Shape to Master Highlighting and Contouring
To make makeup look more natural and balanced, the first step is figuring out your face shape. Once you know it, it becomes much easier to emphasize your best features and soften areas you don’t want to draw attention to. Here’s a simple way to identify your face shape and adjust your technique.
Identifying Your Face Shape
Pull your hair back and stand in front of a mirror with good lighting. Pay attention to how your forehead, cheekbones, and jawline compare, as well as the overall length of your face. The most common face shapes are oval, round, square, heart, and diamond.
Adjusting Techniques for Each Shape
For oval faces, keep things light and balanced—just enhance the natural high points without overdoing contour. For round faces, adding soft definition along the temples and jawline helps create a more structured look. Square faces usually look better when the jawline is gently softened with contour, while the center of the forehead is highlighted for balance.
For heart-shaped faces, a little highlight on the chin and soft contouring at the temples and upper forehead helps even out proportions. Diamond-shaped faces look best when the cheekbones are highlighted and the areas near the hairline and jaw are gently contoured to soften sharper angles.
Highlighting and Contouring Tips for Round Faces
Round faces usually have softer curves, with the width and length appearing quite similar. The goal when applying makeup is to add definition and slightly reshape the face so it doesn’t look overly round. Here are a few simple, practical ways to do that:
Face Contouring Techniques
Start by applying a matte bronzer or contour powder along the hairline and temples. This helps visually reduce the width of the forehead.
Next, define the cheekbones by placing contour slightly below them and blending it diagonally toward the middle of the face, rather than straight back toward the ears.
Avoid bringing too much product down toward the lower cheeks or chin area, as this can make the face look heavier instead of slimmer.
Focus on Lifting the Center of the Face
The main idea is to bring attention upward and toward the center. Add highlighter on the upper cheekbones to create a lifted effect. A small touch on the bridge of the nose and the center of the forehead can also help the face look more structured. Keep the highlighting subtle around the mouth area—too much shine there can make the face look wider instead of defined.
Highlighting and Contouring Tricks for Oval Faces

Oval faces are often considered well-balanced, with naturally proportioned features. Even so, a bit of contour and highlight can enhance structure and make the makeup look more polished.
Work With Your Natural Balance
Since the face already has good symmetry, there’s no need to reshape it heavily. Light highlighting on the center of the forehead, the bridge of the nose, and the cupid’s bow is usually enough to bring brightness to the middle of the face.
Add Soft Dimension
Use a light contour along the temples, hairline, and just under the cheekbones. The key here is subtlety—everything should be well-blended so there are no visible lines. The goal is to add gentle shadow, not change the face shape.
Define the Cheekbones
Oval faces usually already have defined cheekbones. Enhance them by placing highlighter on the top of the cheekbone and a soft contour just underneath. Blend carefully so the transition looks natural rather than sharp.
Keep the Balance
If your face looks slightly longer, you can add a bit more contour along the lower forehead or chin to visually shorten it. If it already feels short or compact, keep contour minimal and focus more on lifting the center with highlight.

Highlighting and Contouring Techniques for Square Faces
Square faces are usually defined by a strong jawline and more angular features. The main goal when highlighting and contouring this face shape is to soften those angles and create the illusion of a slightly longer, more balanced shape. Here’s how to do it:
Softening the Jawline
Apply contour along the jawline to reduce its sharpness and add soft shadow. Blend it well so it doesn’t look harsh or patchy. Keep the area right next to the chin very light—going too dark there can make the jaw stand out even more instead of softening it.
Elongating the Face
To make the face look longer, apply highlighter in a vertical line starting from the center of the forehead, down the bridge of the nose, and lightly onto the chin. This draws the eye upward and down the center, helping the face appear more elongated. Make sure everything is well blended so the highlight looks like natural glow, not obvious stripes.
Balancing the Forehead
Add a soft contour to the temples and sides of the forehead to reduce width. Use a fluffy brush and build it up lightly, blending until there are no visible edges. This helps balance the stronger jawline and brings more harmony to the overall face shape.
Enhancing the Cheekbones
Place highlighter on the top of the cheekbones, just above where you applied contour. This adds lift and dimension without overpowering the rest of the face. A light hand works best here—think soft glow rather than sharp shine.
Highlighting and Contouring Secrets for the Heart-Shaped Face
Heart-shaped faces usually have a wider forehead that narrows down toward a smaller chin, creating a naturally tapered look. A few simple adjustments with highlight and contour can help balance the proportions.
Bring Balance to the Forehead
Start by applying matte bronzer along the temples and hairline to slightly reduce the width of the forehead. Blend it well so it melts into the skin. Then add a bit of highlight to the center of the forehead, down the nose, and lightly on the chin to bring light back into the middle of the face.
Define the Cheekbones
Heart-shaped faces benefit from adding a bit more structure below the cheekbones. Use a soft cream or powder contour just under them and blend upward to avoid a heavy look. Add blush to the apples of the cheeks to bring warmth and make the mid-face feel fuller and more balanced.
Soften the Chin
Use a light contour around the sides of the chin to reduce sharpness, keeping everything subtle. A small touch of highlight on the center of the chin helps bring it forward slightly, making the lower face feel more proportionate overall.
Make It Work for You
There’s no single “perfect” way to contour. Try different product textures and placement until you find what fits your face best. With a bit of practice, you’ll naturally figure out what brings out your features in the most flattering way.
Just For You

How To Plan A Perfect Group Travel Experience
May 25, 2026

How To Plan The Perfect Road Trip Itinerary
May 24, 2026

Drinking Green Tea For Skin: Real Benefits Or Just Hype
March 28, 2026

Why Every Preschooler Needs a Motor-Skill Building Swing Car
March 23, 2026

Game-Driven Learning: Best LMS Platforms That Boost Engagement
March 21, 2026

Detailed Look At HVAC Training Programs For Aspiring Technicians
March 19, 2026
Recommended For You

How To Find The Best Local Food Spots

Tips For Traveling On A Tight Budget Successfully

Best Honeymoon Destinations for 2026 Romantic Getaways for Every Couple

Valentine’s Day Perfumes That Feel Intimate and Elegant
Drinking Green Tea For Skin: Real Benefits Or Just Hype